That's me second from the left. I didn't bake up my pie that day. I wanted to bring it home and freeze it for a cooking with fruit class I was teaching at Whidbey Gardening Workshop the following weekend.
 |
| Participation classes are so much fun. One of my favorite activities is cooking with other people. |
Have everything chilled. Yes, we know this and have done this in the past. But I mean really cold as in freezer cold. The cold is your friend. (Finally, living in the PNW comes in handy for something!) Put your bowl and flour in the freezer ahead. I now keep a bag of flour in the freezer just for pie making. If it's a warm day (like that ever happens around here), cool off your hands in a bowl of ice water as you work. Obviously the butter, and leaf lard if you use it (and I highly recommend that you do), should be straight from the refrigerator. While leaving it out on the counter to soften up ahead of time may work for some recipes, it does not work at all for pie crust. cold Cold COLD is what you want.
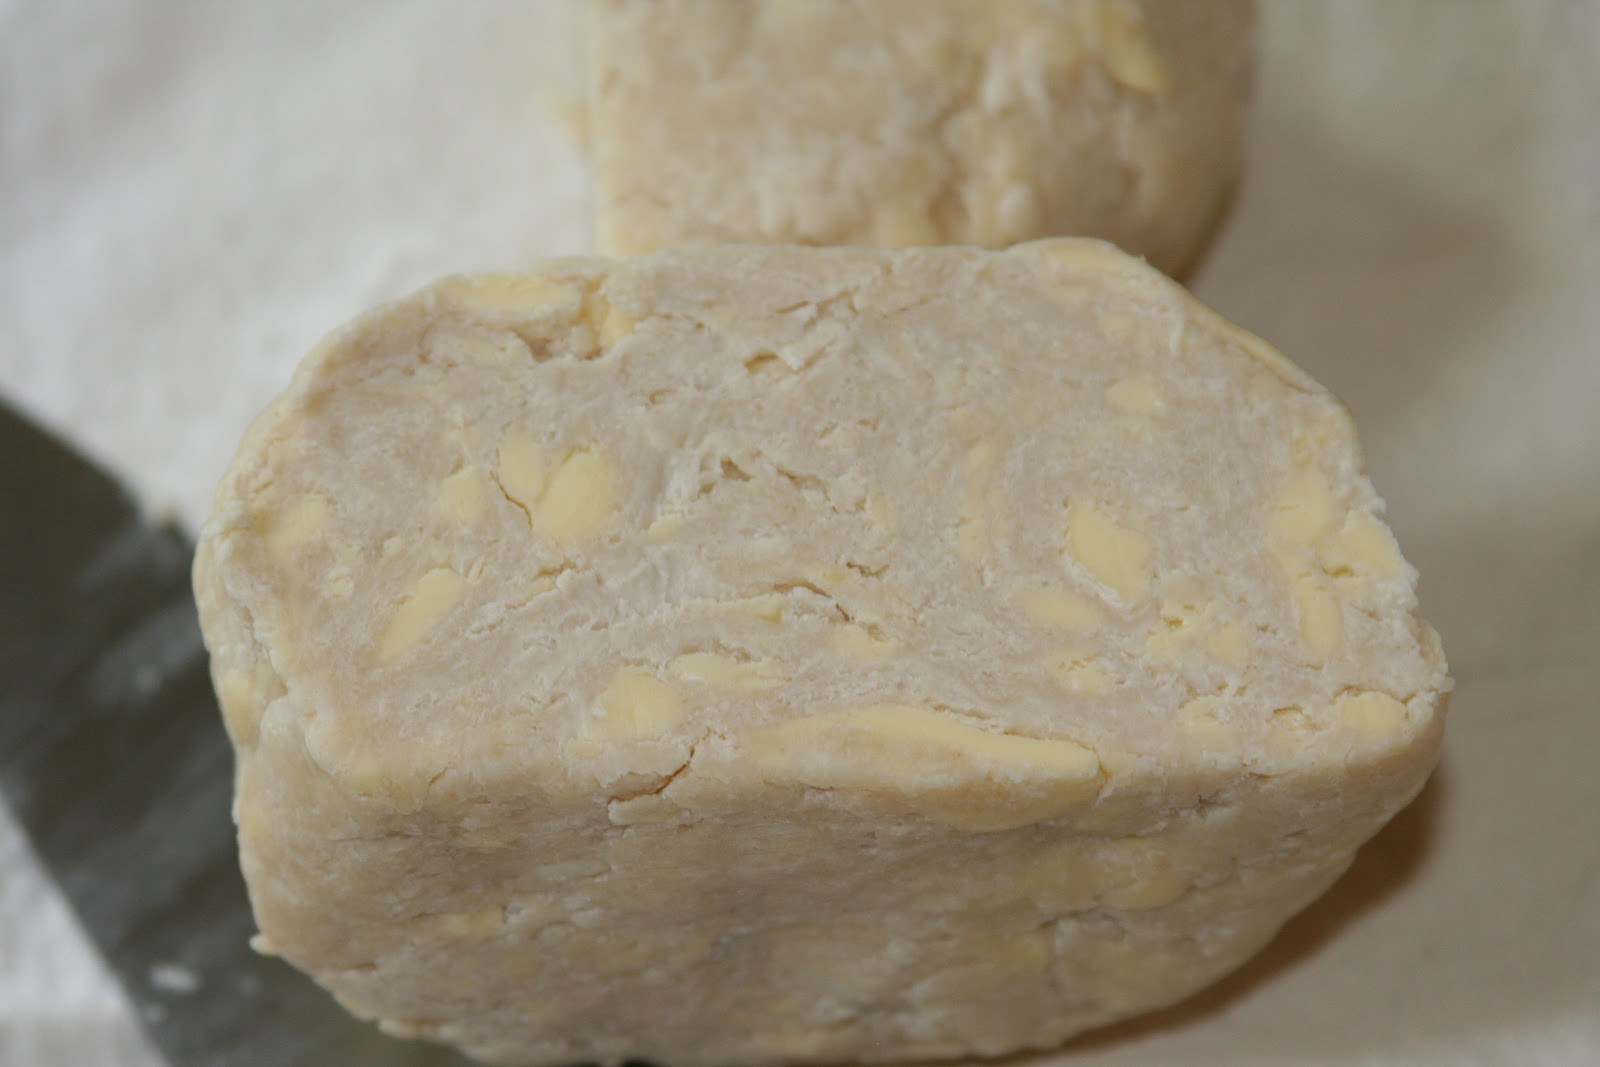
All the bits and blobs of butter and leaf lard are what will make your crust tender and flaky.
Use your hands. First of all, it's just easier. Second of all, there's a lot of love in those hands and it transfers to the pie. When mushing the flour, butter, and leaf lard together, you want different size pieces at the end--some grains of sand, some pea size, and some pecan size. Don't work it too much. If you don't want to use your hands, a pastry blender works too.
 |
| Kate had the same penguin ice bucket we have. We inherited it from Jim's parents. |
Now, about that leaf lard. Leaf lard is the fat from around a pig's kidneys. It makes for very clean, neutral-tasting fat, and is perfect for pastries. It has less saturated fat than butter. Personally, I don't worry about either. It's not like I have pie every day or even every month. Everything in moderation. And remember my number one motto: Fat is what they put in food to make it taste good. If you're not going to have a great-tasting end result, why bother? Kate has put together an informative post about leaf lard, so read it here. And if you live on Whidbey, Scotty's can get it for you. (Isn't he the greatest?) It will be unrendered, but it's easy to render yourself. It's very easy and there are lots of web pages on how to do it.
Work quickly (so things don't warm up) and don't worry about perfection. If the crust tears a bit here or there, you can patch it up before putting in the filling. Once the pie is baked, it's going to look and taste fabulous, so don't worry about little problem spots. Don't even worry about big problem spots. Trust that it will turn out, and it will.

Don't wash your bowl between making the crust and the filling. The
left-overs from the crust will add thickner to the filling. This is my
favorite bowl I inherited from my aunt Helen. Pies made in this bowl
always taste better. It's because of the extra love.

Use the very best ingredients you can find. Make sure your fruit is pie worthy. Local, organic, and seasonal is always best. For my berry pies, I've been using frozen, but I get the organic stuff in the clear plastic bags where you can see the fruit you're buying. The berries are huge and have been individually frozen so they're not all frozen together in big clumps. There's no need to thaw the berries ahead of time.

Kate showed us how to measure out the amount of fruit by putting it in the empty pie plate first. Berries and other fruits that may turn very juicy while baking should be a bit below the rim of the pie plate. Otherwise you may end up with a mess on the floor of your oven. Since my oven is completely self-cleaning, all the time, I don't really care if it bubbles over and I have been putting my berries up about to the rim of the pie plate. With apples, you want them mounded up high in the pie. Pile your whole apples in the pie plate ahead of time and you can get a good enough idea of how many to use by just doing that. So you don't have to worry about how many of your apples are large or medium or small.

Variety is the spice of life, so use many different apple varieties for your apple pies. You want some that will bake up firm and some that will bake up softer, some that are tart and some that are sweet. If you only have one kind, that's perfectly fine. But if you have a variety, even better.
 |
| Kate uses a vintage Veg-O-Matic to chop apples. I scored one from Ebay for $20 including shipping! |
 |
| Kate shows us how to measure one 'oops' of Calvados brandy to flavor the filling. |
 |
| It would be easy to eat the filling before it even gets into the pie! |

Now that the filling is ready, get your dough out of the fridge. It
should have been in there about an hour. You've made enough for a
double crust pie, so divide it in half and return one half to the
fridge. Lay the other half out on a floured pastry cloth (keep it in
the freezer so it's cold too) and give each side a good whack with the
rolling pin.

Roll from the center outward, rolling in one direction only. Turn
the dough as you go. It should be sliding around on the pastry cloth as
it gets bigger. Otherwise, flip it over and dust with more flour.
 |
| A french rolling pin gives you more control and allows you to build a more circular pie crust. |
 |
| Use lots of flour so the crust won't stick. |
Shape doesn't really matter too much as you're going to be trimming
it...and using your trimmings to make little cinny rolls to snack on
while you wait for that pie to bake.

Make sure you've
rolled it out large enough. You'll want about a half inch overhang
AFTER you've pressed it down into your pie plate.
 |
| Use a brush to brush off the excess flour. |
 |
| Roll it over your rolling pin to help transfer the dough to the pie plate. |
 |
| Brush the excess flour from the underside of the dough. |
 |
| And transfer it to your pie plate. |
 |
| Gently push it down into the pie plate. |
  |
| Use an upside down tin to press lightly on the fruit to compact it a bit. |
 |
| After you put the top crust on, trim the crusts to about 1/2 inch from the edge of the pie plate. Don't forget to save them to make cinny rolls. |
 |
| Now roll the edges of the pie crust inwards and then press with a fork or crimp to make an edge. |
 |
| Cut some slits to let stream escape. |
 |
| Brush with an egg wash and sprinkle with sugar. |
 |
| We learned how to tell when the pie was done by using all the senses, including hearing. |
Within a week of taking Kate's class, I turned out a delicious blueberry pie with lattice crust! I've also made a couple marionberry pies as well as pumpkin pies. I cannot wait for peach season as I have several peach pie recipes to try out. Pie has become my new favorite thing to make!


I now know that it's so much more than just a recipe--it's a combination of love, confidence, ingredients and technique combined with the knowledge of what to look for every step of the way--it is truly an art.

Blueberry Pie
2 bags of organic frozen blueberries (no need to defrost them first)
1 Tablespoon tapioca
2/3 cup sugar
splash of Grand Marnier
splash of lemon juice
pinch of nutmeg
2 Tablespoons flour
1 teaspoon kosher salt
optional - small amount of chopped lemon verbena or lemon thyme
Mix all of the above together in the same bowl you used to make the crust. After laying the bottom crust in the pie plate, pour in the blueberry filling. This makes enough for a 9-inch pie. Dot the filling with small pieces of butter. Then lay your top crust. I like a lattice crust on blueberry pies. There are a lot of youtube videos on how to crisscross a lattice crust. Here's one. It's really easy. Flute the edges after you've laid out the lattice. Then beat in a small bowl one egg white and 1 Tablespoon of water. Brush that on top of the crust. Sprinkle sugar over the crust.
Bake at 425 degrees for 20 minutes; then lower the temp to 350 degrees and bake 30 - 40 minutes more. It's always tempting to pull the pie before it's ready. I almost always bake the pie for longer than the time called for. For the first phase, I bake right on the floor of the roasting oven. For the second phase I bake either in the middle of the baking oven or near the top, depending on what temps are called for in the recipe.

Pumpkin Pie
3 beaten eggs
2 cups canned or cooked pumpkin
1 cup evaporated milk or coconut milk
3/4 cup sugar (use half white sugar and half brown sugar)
1/2 teaspoon salt
1-1/2 teaspoons cinnamon
1-1/2 teaspoons ginger
1/2 teaspoon nutmeg
1/2 teaspoon allspice
1/4 teaspoon cloves
splash of brandy
Mix all the above ingredients either in a stand mixer or by hand. Pour into pie crust. This makes enough filling for an 8-inch pie. Bake for 15 - 20 minutes at 425; then bake at 350 until the custard filling is nearly set. The total time is usually about 1 hour. Cool completely. Serve whipped cream on the side.

Berry Pie
1-1/2 pounds frozen or fresh berries (no need to thaw if frozen)
3/4 cup sugar
1/2 teaspoon salt
pinch of nutmeg
splash (1 capful) of lemon juice
splash of Grand Marnier or other liquor
1 Tablespoon tapioca
2 Tablespoons flour
Mix the filling ingredients together in the same bowl you mixed the crust in. After laying the bottom crust in the pie plate, pour in the berry filling. This makes enough for a 9-inch pie. Dot the filling with small pieces of butter. Then lay your top crust. Cut vents in the top crust and flute the edges. Then beat in a small bowl one egg white and 1 Tablespoon of water. Brush that on top of the crust. Sprinkle sugar over the crust.
Bake at 425 degrees for 20 minutes; then lower the temp to 350 degrees and bake 30 - 40 minutes more. It's always tempting to pull the pie before it's ready. I almost always bake the pie for longer than the time called for. For the first phase, I bake right on the floor of the roasting oven. For the second phase I bake either in the middle of the baking oven or near the top, depending on what temps are called for in the recipe.

Cinnamon Rolls
When I was growing up, my mom always made tiny cinnamon rolls with the leftover pie dough. Just roll the leftover dough out in a rough rectangular shape. Spread softened butter on over one side, sprinkle liberally with cinnamon and sugar, then roll it up. Cut into little pieces and bake on a small cookie sheet type of pan. You can put them in right along with the pie, but they'll only take 10 or 15 minutes. Now you have something to eat while you wait to dig into that pie!